NestJS 入门(四)Redis 和注销
前言
上一章我们讲解了生成 JWT ,并实现了用户登录的接口,由于 JWT 的无状态性,只要 JWT 还未过有效期,那么该 JWT 就一直会被服务器认为是有效的,这就会引发一些安全问题。例如上一章我们设置 JWT 的过期时间为 4 个小时,那么不论用户是关闭浏览器,或者手动退出登录,该 JWT 都是不会失效的,而我们希望当用户退出登录后,当前用户的 JWT 就失效,本章将通过 Redis 来实现这个功能。关于 Redis:Redis 是什么本文就不再赘述,笔者是在 docker 中安装的 Redis,具体可看我博客的这篇文章:使用 docker 创建 Redis 服务
实现思路
思路参考这篇文章,具体是:
-
生成 JWT 后(这里生成 JWT 时不设置过期时间),将该 token 存入 Redis 中,并设置 Redis 的过期时间为 4 小时(在 Redis 中设置过期时间,间接的控制了 JWT 的有效时间)
-
服务器通过删除 Redis 中的 JWT 来实现作废
-
用户请求接口时,取出 headers 中的 JWT,判断 JWT 自身是否过期,如果没有过期则与 Redis 中的 JWT 进行比较
-
如果 Redis 中并没有一致的 JWT,则说明该 JWT 被服务器作废,如果找到了一致的 JWT,说明该 JWT 仍然有效,此时重置 Redis 中的过期时间为 4 小时。
这里的意思是,用户登录获取了 JWT 后,只要用户在 4 小时内发请求,则会不断刷新 Redis 中的过期时间,相当于不断给 JWT 续期。当出现以下三种情况:
-
登出
-
JWT 被服务器作废
-
超过 4 小时没有发请求
JWT 就会被服务器判定为失效。
修改现有代码
现在我们的 JWT 由 Redis 来控制,因此我们在签发 JWT 时,不设置过期时间。
1
2
3
4
5
6
7
8
9
10
11
12
13
14
|
...
const jwtModule = JwtModule.registerAsync({
inject: [ConfigService],
useFactory: async (configService: ConfigService) => ({
secret: configService.get('JWT_SECRET') ?? 'secret',
signOptions: {
},
}),
});
...
|
在.env.local文件中,配置 Redis 相关的环境变量:
1
2
3
4
5
6
7
8
9
| ...
JWT_SECRET=superNB
JWT_EXPIRES_IN=60000
REDIS_HOST=localhost
REDIS_PORT=6379
REDIS_DB=1
REDIS_PASSWORD=123456
|
注意这里的JWT_EXPIRES_IN变成了数字,是1 * 60 * 1000毫秒,即 1 分钟,为什么这么改下文会说明。
在 NestJS 中引入 Redis
安装依赖:
1
2
| pnpm install @nestjs/cache-manager cache-manager cache-manager-redis-yet redis -S
pnpm install @types/cache-manager -D
|
这里注意,我们安装的是cache-manager-redis-yet这个包,网上大多数教程安装的是cache-manager-redis-store这个包,后者目前配合 TS 使用有点问题,详见我的另一篇文章:Nestjs v10 中使用 Redis 作为 CacheStore 的坑
创建目录和文件:
1
2
| nest g mo db/redis
nest g service db/redis
|
编辑/src/db/redis/redis.module.ts文件:
1
2
3
4
5
6
7
8
9
10
11
12
13
14
15
16
17
18
19
20
21
22
23
24
25
26
27
28
29
30
31
32
33
| import { Module, Global } from '@nestjs/common';
import { CacheModule } from '@nestjs/cache-manager';
import { ConfigModule, ConfigService } from '@nestjs/config';
import { redisStore } from 'cache-manager-redis-yet';
import type { RedisClientOptions } from 'redis';
import { RedisService } from './redis.service';
@Global()
@Module({
imports: [
CacheModule.registerAsync<RedisClientOptions>({
imports: [ConfigModule],
inject: [ConfigService],
useFactory: async (configService: ConfigService) => {
const store = await redisStore({
socket: {
host: configService.get<string>('REDIS_HOST'),
port: configService.get<number>('REDIS_PORT'),
},
ttl: configService.get<number>('REDIS_TTL'),
database: configService.get<number>('REDIS_DB'),
password: configService.get<string>('REDIS_PASSWORD'),
});
return {
store,
};
},
}),
],
providers: [RedisService],
exports: [RedisService],
})
export class RedisModule {}
|
然后我们编辑redis.service.ts来实现读写的方法:
1
2
3
4
5
6
7
8
9
10
11
12
13
14
15
16
| import { CACHE_MANAGER } from '@nestjs/cache-manager';
import { Inject, Injectable } from '@nestjs/common';
import { Cache } from 'cache-manager';
@Injectable()
export class RedisService {
constructor(@Inject(CACHE_MANAGER) private readonly cacheManager: Cache) {}
async get<T>(key: string): Promise<T> {
return await this.cacheManager.get(key);
}
async set(key: string, value: any, ttl?: number): Promise<void> {
return await this.cacheManager.set(key, value, ttl);
}
}
|
在app.module.ts中注册RedisModule,如果是通过nest g mo命令生成的RedisModule,那 NestJS 会自动在app.module.ts中注册。并且由于我们使用了@Global()装饰器,我们在其他模块中使用时,不需要再在module中注册。
签发 JWT 时存入 Redis
1
2
3
4
5
6
7
8
9
10
11
12
13
14
15
16
17
18
19
20
21
22
23
24
25
26
27
28
29
30
31
32
33
34
|
import { Injectable } from '@nestjs/common';
import { ConfigService } from '@nestjs/config';
import { JwtService } from '@nestjs/jwt';
import { RedisService } from 'src/db/redis/redis.service';
import { User } from 'src/user/entities/user.entity';
@Injectable()
export class AuthService {
constructor(
private jwtService: JwtService,
private redisService: RedisService,
private readonly configService: ConfigService,
) {}
async login(user: Partial<User>) {
const payload = { username: user.username, id: user.id };
const access_token = this.jwtService.sign(payload);
await this.redisService.set(
`token_${user.id}`,
access_token,
this.configService.get('JWT_EXPIRES_IN'),
);
return {
access_token,
type: 'Bearer',
};
}
}
|
可以看到,我们在调用this.redisService.set()函数时,传入的第三个参数为this.configService.get('JWT_EXPIRES_IN'),从redis.service.ts文件中我们不难发现,这里的第三个参数对应的是ttl,即 Redis 中这条数据的过期时间,在当前场景下,就是 JWT 的有效时间,因此直接从环境变量中读取JWT_EXPIRES_IN的值,由于这里的ttl的单位是毫秒,我们在上文的编辑.env.local文件时,将JWT_EXPIRES_IN值进行了改动,改为了60000毫秒,即 60 秒,设置这么短是为了测试方便看出效果,大家可以根据实际情况进行调整。
测试一下是否生效:
1
2
3
4
| curl --location --request POST 'http://localhost:3000/auth/login' \
--header 'Content-Type: application/x-www-form-urlencoded' \
--data-urlencode 'username=wang' \
--data-urlencode 'password=123456'
|
响应:
1
2
3
4
5
6
7
8
| {
"code": 0,
"message": "请求成功",
"data": {
"access_token": "eyJhbGciOiJIUzI1NiIsInR5cCI6IkpXVCJ9.eyJ1c2VybmFtZSI6IndhbmciLCJpZCI6MTQsImlhdCI6MTY5MDQyOTM1NH0.bmkZ5PPeZTIRyzlppmvlI3SVcQTx3b0aRHtt5ZOXMiI",
"type": "Bearer"
}
}
|
通过 Redis 图形化管理器看一下我们的 Redis 数据库:
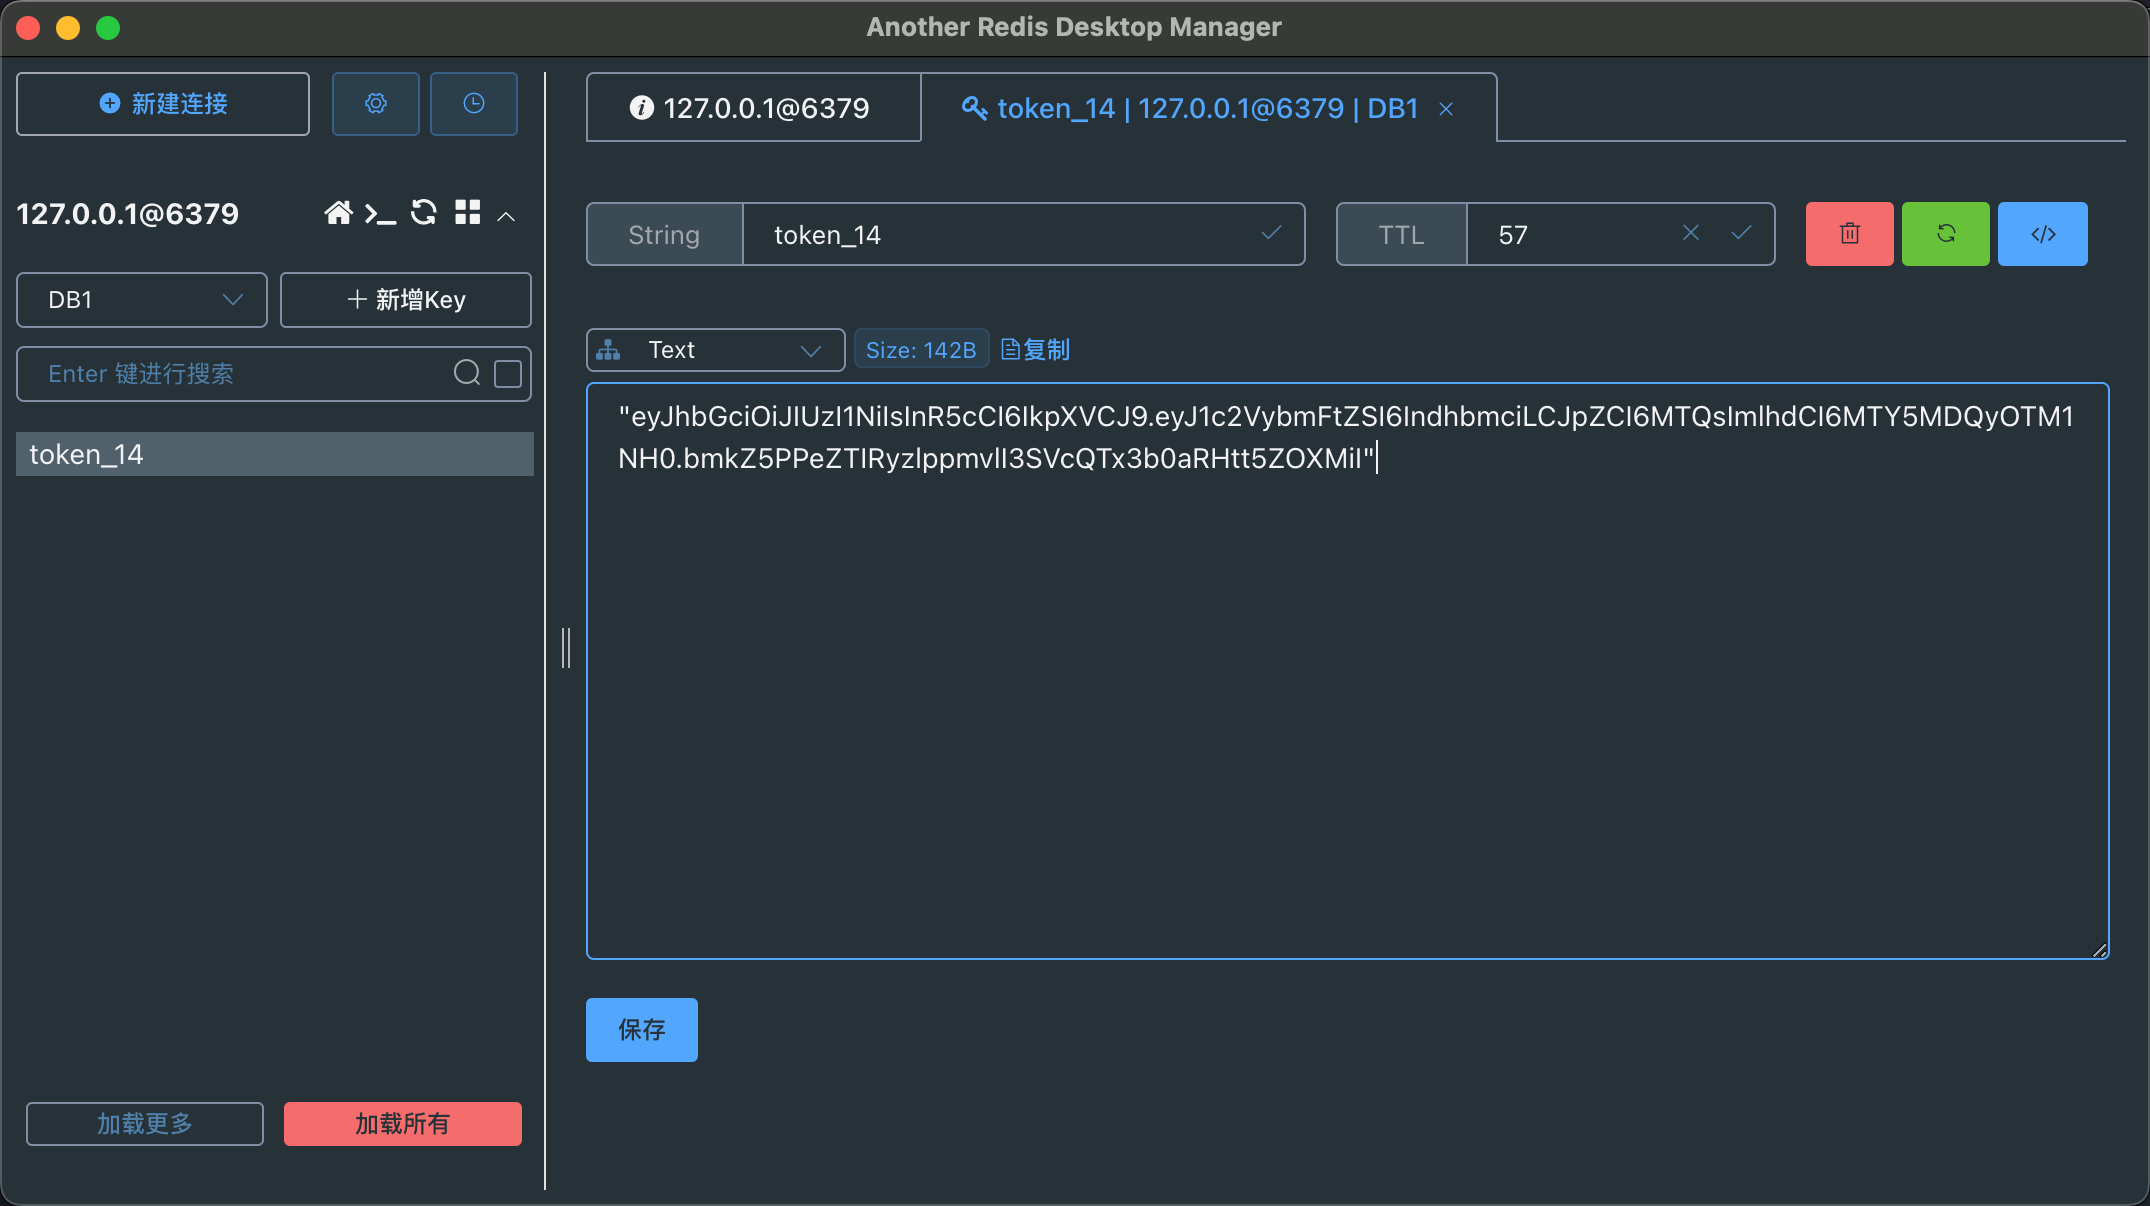
可以看到,已经成功将 JWT 存入了 Redis,过期时间也与我们设置的 1 分钟一致。
1 分钟之后,Redis 自动删除了这条数据:

请求时进行校验
校验 JWT 的逻辑写在策略中,因此我们对策略进行修改:
1
2
3
4
5
6
7
8
9
10
11
12
13
14
15
16
17
18
19
20
21
22
23
24
25
26
27
28
29
30
31
32
33
34
35
36
37
38
39
40
41
42
43
44
45
46
47
48
49
|
import { PassportStrategy } from '@nestjs/passport';
import { InjectRepository } from '@nestjs/typeorm';
import { Repository } from 'typeorm';
import { ExtractJwt, Strategy } from 'passport-jwt';
import type { StrategyOptions } from 'passport-jwt';
import { Injectable, UnauthorizedException } from '@nestjs/common';
import { ConfigService } from '@nestjs/config';
import type { Request } from 'express';
import { User } from 'src/user/entities/user.entity';
import { RedisService } from 'src/db/redis/redis.service';
@Injectable()
export class JwtStrategy extends PassportStrategy(Strategy) {
constructor(
@InjectRepository(User) private readonly userRepository: Repository<User>,
private readonly configService: ConfigService,
private readonly redisService: RedisSerivce,
) {
super({
jwtFromRequest: ExtractJwt.fromAuthHeaderAsBearerToken(),
secretOrKey: configService.get('JWT_SECRET') ?? 'secret',
passReqToCallback: true,
} as StrategyOptions);
}
async validate(req: Request, payload: User) {
const token = ExtractJwt.fromAuthHeaderAsBearerToken()(req);
const existUser = await this.userRepository.findOne({
where: { id: payload.id },
});
const cacheToken = await this.redisService.get(`token_${existUser.id}`);
if (!cacheToken) throw new UnauthorizedException('token已过期');
if (token !== cacheToken) throw new UnauthorizedException('token不正确');
if (!existUser) throw new UnauthorizedException('token验证失败');
await this.redisService.set(
`token_${existUser.id}`,
token,
this.configService.get('JWT_EXPIRES_IN'),
);
return existUser;
}
}
|
注意点:
-
在①处引入 RedisService
-
②处需要将passReqToCallback设置为true,作用是将请求传递给下面的validate()函数,可以看到,③处的validate()函数接受的第一个参数就是req:Request,否则的话validate()函数是拿不到请求的,也就不能从请求头中拿到 JWT
-
④处是刷新了 Redis 中 JWT 的持续时间,意思就是用户只要发送了请求并且 JWT 验证通过后,就会刷新 JWT 的有效期,达到续期的目的。在本例中,用户一分钟没有操作,JWT 就会过期
等待一分钟后重新请求:
1
2
| curl --location --request GET 'http://localhost:3000/user' \
--header 'Authorization: Bearer eyJhbGciOiJIUzI1NiIsInR5cCI6IkpXVCJ9.eyJ1c2VybmFtZSI6IndhbmciLCJpZCI6MTQsImlhdCI6MTY5MDQzMDM1Mn0._oUGBOO8ycgyjnU1sJLEAmN4Q-B2EsK2wnuL4NHhUks'
|
1
2
3
4
5
| {
"code": 401,
"message": "token已过期",
"content": {}
}
|
校验成功。
注销接口
接下来我们就通过删除 Redis 中的 key 的方式,实现注销用户登录的接口。
在redis.service.ts中新增删除数据的方法:
1
2
3
4
5
6
7
8
9
10
11
12
13
14
15
16
17
18
19
20
21
| import { CACHE_MANAGER } from '@nestjs/cache-manager';
import { Inject, Injectable } from '@nestjs/common';
import { Cache } from 'cache-manager';
@Injectable()
export class RedisService {
constructor(@Inject(CACHE_MANAGER) private readonly cacheManager: Cache) {}
async get<T>(key: string): Promise<T> {
return await this.cacheManager.get(key);
}
async set(key: string, value: any, ttl?: number): Promise<void> {
return await this.cacheManager.set(key, value, ttl);
}
async del(key: string): Promise<void> {
return await this.cacheManager.del(key);
}
}
|
在auth模块中,新增相应逻辑:
1
2
3
4
5
6
7
8
9
10
11
12
13
14
15
16
17
18
19
20
21
22
23
24
25
26
27
28
29
30
31
32
33
34
35
|
import ...
@Controller('auth')
export class AuthController {
constructor(private readonly authService: AuthService) {}
...
@Delete('logout')
logout(@Req() req: Request) {
return this.authService.logout(req.user);
}
}
import ...
@Injectable()
export class AuthService {
constructor(
...
private redisService: RedisService,
) {}
...
async logout(user: Partial<User>) {
await this.redisService.del(`token_${user.id}`);
}
}
|
用户在DELETE /auth/logout接口后,请求其他需要身份认证接口时,都会报token已过期错误。
后记
本章中的例子有一些限制,比如只支持一个 JWT,也就是说,用户只能在一处进行登录,例如用户网页登录了,然后又用客户端登录,那先登录的网页就会失效,因为 Redis 中只存一条 JWT,并且已经被客户端登录时签发的 JWT 替换了。
Nest学习系列博客代码仓库 (github.com)
冷面杀手的个人站 (bald3r.wang)
NestJS 相关文章